[:en]In this little tutorial you will learn how to create a gravity like a Mario platformer.
Let’s start!
Get files
- Save these 2 sprites (Right click > Save as)


- Open Flash and create a new ActionScript 3.0 document.
- Document properties: 24 fps, 550×400 by default.
Create the Hero MovieClip
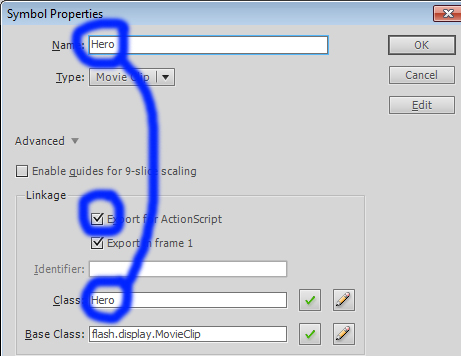
- Create a new Symbol: Insert > New symbol > MovieClip
- Symbol name: Hero
- Check Export for ActionScript
- And Click OK
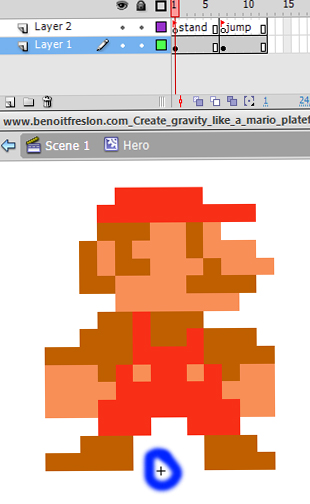
- Now you are in you Hero symbol! Perfect!
- Import the first sprite: mario_stand.png on the first frame:
- File > Import > Import to stage > mario_stand.png
- Set the sprite just on the top of the little black cross (pivot point)
- Now create an empty keyframe on the timeline:
- Timeline > 2nd frame on the timeline > Right Click > Create empty Keyframe
- Import the second sprite: mario_jump.jpg on the second keyframe
- Then create a new layer on the top and set 2 labels names
- Insert > Timeline > New layer
- And add 2 labels names:
- On the timeline click on the first key frame with the mario_stand.png sprite and go to the Properties pannel > Label > Name > stand
- On the timeline click on the second key frame with the mario_jump.png sprite and go to the Properties pannel > Label > Name > jump
Add the jump script
- Back to the main scene: Click on the Scene 1
- Add a new layer named « Actions »: Insert > Timeline > New layer
- And open the Actions pannel: Timeline > Actions Layer > Keyframe > Right click > Actions
- Finally copy and paste this code:
// The game gravity
var gravity = 0.8;

// The floor position (y)
var floor = 300;

// Add the hero MovieClip
var hero = new Hero();
// Set the x position
hero.x = 550 / 2;
// Set the y position on the floor
hero.y = floor;
// Set the hero state to "stand"
hero.gotoAndStop("stand");

// Add hero on the display list
addChild(hero);

// Create and set the speedY property to 0
hero.speedY = 0;
// Create and set the jump impulsion to 10
hero.impulsion = 10;
// Add an enter frame event
hero.addEventListener(Event.ENTER_FRAME, heroEnterFrame);
function heroEnterFrame(pEvent)
{
	// On each frames...

	// Set the world gravity
	hero.speedY +=  gravity;

	// Move the hero with his speedY
	hero.y +=  hero.speedY;

	// If the y property is larger than the floor position
	if (hero.y > floor)
	{
		// Set the hero on the floor
		hero.y = floor;
		// Cancel the current speed
		hero.speedY = 0;
		// Change the state to stand
		hero.gotoAndStop("stand");
	}
}

// Add a mouse event on the stage
stage.addEventListener(MouseEvent.MOUSE_DOWN, mouseDown);

function mouseDown(pEvent)
{
	// When the user click on the stage...

	// If the hero is standing
	if (hero.currentLabel == "stand")
	{
		// Set the new speedY with the hero impulsion
		hero.speedY =  -  hero.impulsion;
		// And change the state to jump
		hero.gotoAndStop("jump");
	}
}
[swf:/wp-content/uploads/2011/02/www.benoitfreslon.com_Create_gravity_like_a_mario_plateformer.swf 550 400]
Download sources: www.benoitfreslon.com_Create_gravity_like_a_mario_plateformer[:fr]Dans ce petit tutoriel je vais vous montrer comment créer une une gravité sur un personnage comme dans la pluspart des jeux de plateformes.
Commençons !
Télécharger les fichiers
- Sauvegarder sur votre ordinateur ces 2 images (Click droit > Enregistrer sous)


- Ourvir Flash (CS3, CS4 ou CS5) et créer un nouveau document ActionScript 3.0
- Régler les propriétés du document à 24 ips, et 550×400 px (propriétés par défaut)
Création d’un MovieClip pour le héros
- Créer un nouveau symbole : Insertion > Nouveau Symbole > MovieClip
- Nom du symbole: Hero (en Anglais, oui c’est la convention :))
- Cocher : Exporter pour ActionScript
- Enfin Cliquer OK
- Maintenant vous vous trouvez dans le symbole du Hero. Super !
- Importer le premier sprite de mario : mario_stand.png sur la première image clé.
- Fichier > Importer > Importer sur la scène > mario_stand.png
- Placer le sprite juste au dessus du repère local du symbole (la petite croix noire)
- Maintenant créer une nouvelle image clé vide sur le scénario un peu plus loin :
- Scénario> autre image sur le scénario > Click droit > Ajouter une image clé vide
- Importer la seconde image : mario_jump.jpg sur l’autre image clé
- Insertion > Sénario> Nouveau calque
- Ensuite créer un nouveau calque et ajouter 2 noms d’étiquette
- Sur le scénario cliquer sur la première image clé où se trouve le mario_stand.png et aller dans la panneau Propriétés : Etiquette > Nom > stand
- Sur le scénari cliquer sur la seconde image clé où se trouve le mario_jump.png et aller dans le panneau Propriétés : Etiquette > Nom > jump
Ajouter le code du saut
- Revenir sur la scène principale : Cliquer sur Scène 1
- Ajouter un nouveau calque nommé « Actions » : Insertion > Scénario > Nouveau calque
- Puis ouvrir le panneau Action : Scénario > Calque Actions > Clic que une image clé > Clic Droit > Actions
- Enfin copier/coller ce bout de code :
// La gravité
var gravity = 0.8;

// La position du sol (y)
var floor = 300;

// Ajouter le MovieClip du héros
var hero = new Hero();

// Position en x du héros
hero.x = 550/2;

// Position en y du héros
hero.y = floor;

// Mettre l'état du héros à l'état "stand
hero.gotoAndStop("stand");

// Ajouter le héros sur la liste d'affichage
addChild(hero);

// Création de la propriété speedY sur le héros et l'initialiser à 0
hero.speedY = 0

// Création de la propriété impulsion sur le héros et l'initialiser à 10
hero.impulsion = 10;

// Ajout d'un écouteur d'événement entre chaque frame sur le héros
hero.addEventListener(Event.ENTER_FRAME, heroEnterFrame)

function heroEnterFrame (pEvent)
{
	// Entre chaques frames
	// Appliquer la gravité sur la vitesse
	hero.speedY += gravity;

	// Bouger le héros en fonction de sa vitesse
	hero.y += hero.speedY;

	// Si le y du héros dépasse la limite du sol
	if (hero.y > floor)
	{
		// Le héros est replacé au niveau du sol
		hero.y = floor

		// Anuler la vitesse actuelle en cas de contact avec le sol
		hero.speedY = 0;

		// changer l'état du héros pour l'état "stand"
		hero.gotoAndStop("stand");
	}
}

// Ajouter un écouteur d'événement sur la scène au clic enfoncé
stage.addEventListener(MouseEvent.MOUSE_DOWN, mouseDown)

function mouseDown (pEvent)
{
	// Quand l'utilisateur clic
	// Si le héros et à l'état de "stand"
	if (hero.currentLabel == "stand")
	{
		// Lui donner une impulsion vers le haut
		hero.speedY = -hero.impulsion;

		// passer son état à l'état "jump"
		hero.gotoAndStop("jump");
	}
}
[swf:/wp-content/uploads/2011/02/www.benoitfreslon.com_Create_gravity_like_a_mario_plateformer.swf 550 400]
Télécharger les sources : www.benoitfreslon.com_Create_gravity_like_a_mario_plateformer[:]


