Tutorial: Export your Flash animations on iPhone and iPad with cocos2d and TexturePacker

[:en]Hello,

In this tutorial I will show you how to build and use a flexible animation .swf  for universal use (iPhone, iPad and retina display) with cocos2D-iPhone 2.0.

I always use Adobe Flash to make games, whatever the support.

Flash is an amazing tool for game developer: WYSIWYG layout, animation tool, vector graphics editor.
Do you want to scale up you entire animation? No problem if you work with vector graphics.

You can download the final AnimatedSpriteWithFlash.zip file.

1. Tools and files

You need some tools and one Class made for Cocos2D in Objective-C.

  • Download and install the last Cocos2D-iPhone 2.0 libraries with templates in XCode.
  • Download and install Adobe Flash.
  • Download and install TexturePacker.
  • Download the AnimationSprite class from github.
  • Download the Flash animations example : Pig.zip

[swf:/wp-content/uploads/2013/03/pig_dead.swf 100 100]
[swf:/wp-content/uploads/2013/03/pig_walk.swf 100 100]

2. Flash

In Flash

  • Open pig_walk.fla and pig_dead.fla with Adobe Flash.
  • Then export you animation with CMD+Enter or CTRL+Enter for windows users.
  • Flash will export a swf file in the same folder: pig_walk.swf and pig_dead.swf.

Flash Tips

  • Create a dummy cross in the middle of the sprite. Only for position reference purpose. Remove it before exporting your animation or set the layer as a Guide to hide it.
  • Use the same stage dimensions for the same object.
  • Use graphic symbols instead MovieClip. Because graphic animations can be exported with TexturePacker.

Capture d’écran 2013-03-01 à 17.45.44

  • Create one .fla file per animation.
  • Always work for the iPad retina scale (2048×2048). May be you will export your project for iPad in the future :).

3. TexturePacker

In TexurePacker

Let’s use a default export for universal application with a compressed spritesheet altlas.

  1. Drag and drop pig_walk.swf and pig_dead.swf in TexturePacker
  2. Click on the […] on the data file textfield, chose your export folder and enter the name pig-ipadhd.plist (For universal application)
  3. Texture format set zlib compr, PVR (.pvr.ccz, Ver.2)
  4. Check Premultiply alpha
  5. AutoSD: set cocos2D ipad/hd/sd and hit apply.
  6. Save the file and hit Publish: TexturePacker will export 6 files, the pvr texture file with the plist database file for each scale (ipad/hd/sd).

pig

TexturePacker tips

  • Set the Image format to RGBA4444 if you want to optimise your media. And Set the Dithering to FloydSteinbergAlpha (Better gradient effect with RGBA4444).
  • Always work with the same framerate in  your animations: Flash XCode.
  • The max size is 4096×4096 for retina device and 2048×2048 for iPhone 3GS. But TexturePacker will adapt the max size.
  • Check Allow rotation
  • Set size contraints to Any size
  • If you sprites are cropped in you game set Trim mode to None
  • Check Enable auto alias
  • Be curious and test any settings… :)

4. XCode

in Xcode

  • Create a new Cocos2D project template with XCode.
  • Set iOS deployment Target to 5.1 at least.
  • Add the AnimatedSprite.m and the AnimatedSprite.h files into your XCode project. Don’t forget to check the target.

Capture d’écran 2013-03-02 à 11.56.56

  • If you don’t use ARC in your current project set a flag in the Target > Build Phases > And set the compiler flag to the filename AnimatedSprite.m > –fojbc-arc. NB: By default the ARC is disabled.

Capture d’écran 2013-03-01 à 16.58.30

  • Add all this files into the XCode projet:
    • pig.plist
    • pig.pvr.ccz
    • pig-hd.plist
    • pig-hd.pvr.ccz
    • pig-ipadhd.plist
    • pig-ipadhd.pvr.ccz

Capture d’écran 2013-03-02 à 11.57.02

  • Open the HelloWorldLayer.h and use this header:
// When you import this file, you import all the cocos2d classes

#import "cocos2d.h"

#import "AnimatedSprite.h"

// HelloWorldLayer

@interface HelloWorldLayer : CCLayer

{

    AnimatedSprite *pig;

}

// returns a CCScene that contains the HelloWorldLayer as the only child

+(CCScene *) scene;

@end
  • Then use this code for the HelloWorldLayer.m
// Import the interfaces
#import "HelloWorldLayer.h"

// Needed to obtain the Navigation Controller
#import "AppDelegate.h"

#import "AnimatedSprite.h"

#pragma mark - HelloWorldLayer

// HelloWorldLayer implementation
@implementation HelloWorldLayer

// Helper class method that creates a Scene with the HelloWorldLayer as the only child.
+(CCScene *) scene
{
	// 'scene' is an autorelease object.
	CCScene *scene = [CCScene node];

	// 'layer' is an autorelease object.
	HelloWorldLayer *layer = [HelloWorldLayer node];

	// add layer as a child to scene
	[scene addChild: layer];

	// return the scene
	return scene;
}

// on "init" you need to initialize your instance
-(id) init
{
	// always call "super" init
	// Apple recommends to re-assign "self" with the "super's" return value
	if( (self=[super init]) ) {

		self.touchEnabled = YES;

		// Load the pig spritesheet
		[self loadSpritesheet:@"pig"];

		// Create the pig instance with a default sprite
		pig = [AnimatedSprite spriteWithSpriteFrameName:@"pig_walk.swf/0000"];

		// Init a looping animation
		[pig addLoopingAnimation:@"walk" frame:@"pig_walk.swf/%04d" delay:0.05f];

		// Init an animation
		[pig addAnimation:@"dead" frame:@"pig_dead.swf/%04d" delay:0.05f target:self callback:@selector(removePig)];

		// Set the position of the sprite
		pig.position = ccp(200,200);

		// Add the sprite in the scene
		[self addChild:pig];

		// Start the walk animation
		[pig startAnimation:@"walk"];

	}
    return self;
}

- (void) ccTouchesBegan:(NSSet *)touches withEvent:(UIEvent *)event {
	CCLOG(@"Start dead animation");
	[pig startAnimation:@"dead"];
}

- (void) removePig {
	CCLOG(@"Remove pig");
	[pig removeFromParentAndCleanup:YES];
}

- (void) loadSpritesheet:(NSString *)spritesheetName {

	[CCTexture2D PVRImagesHavePremultipliedAlpha:YES];
	[CCTexture2D setDefaultAlphaPixelFormat:kCCTexture2DPixelFormat_RGBA4444];
	NSString *pvrccz = [NSString stringWithFormat:@"%@.pvr.ccz", spritesheetName];
	CCSpriteBatchNode *loadingBatchNode = [CCSpriteBatchNode batchNodeWithFile:pvrccz];
	[self addChild:loadingBatchNode z:2];
	NSString *plist = [NSString stringWithFormat:@"%@.plist", spritesheetName];
	[[CCSpriteFrameCache sharedSpriteFrameCache] addSpriteFramesWithFile:plist];
	[CCTexture2D setDefaultAlphaPixelFormat:kCCTexture2DPixelFormat_Default];
}
// on "dealloc" you need to release all your retained objects
- (void) dealloc
{
	// in case you have something to dealloc, do it in this method
	// in this particular example nothing needs to be released.
	// cocos2d will automatically release all the children (Label)

	// don't forget to call "super dealloc"
	[super dealloc];
}
@end

Run and see the result.

If you tap on the screen the dead animation will run and the pig will be removed.

That’s all !

Capture d’écran 2013-03-04 à 00.09.40

See the AnimatedSprite.h you will see all the public methods and public properties.

Have fun ![:fr]Salut amis codeurs iOS,

Dans ce tutorial je vais vous montrer comment exporter une animation .swf utilisable pour iPhone iPad et pour les supports retina avec cocos2d-iPhone 2.0. En gros un truc qui fait le café !

J’utilise toujours Adobe Flash lorsque je développe des jeux quelque soit le support.
Flash est un super outils pour les développeurs : interface WYSIWYG, éditeur d’animations, éditeur vectoriel, …
Si je veux redimensionner mes animations aucun problème avec le vectoriel :).

You pouvez télécharger le zip final AnimatedSpriteWithFlash.zip.

1. Outils et fichiers

Vous avez besoin de quelques outils et quelques fichiers :

  • Télécharger et installer les librairies Cocos2D-iPhone 2.0 libraries avec le template.
  • Télécharger et installer Adobe Flash.
  • Télécharger et installer TexturePacker.
  • Télécharger les classes AnimatedSprite sur github.
  • Télécharger les animations Flash : Pig.zip.

[swf:/wp-content/uploads/2013/03/pig_dead.swf 100 100]
[swf:/wp-content/uploads/2013/03/pig_walk.swf 100 100]

2. Flash

Dans Flash

  • Ouvrir pig_walk.fla et pig_dead.fla avec Adobe Flash.
  • Ensuite exporter les animations avec CMD+Entrée ou CTRL+Entrée sous Windows.
  • Flash va exporter un fichier .swf dans le même dossier : pig_walk.swf et pig_dead.swf.

Astuces dans Flash

  • Créer un repère au centre de la scène. Seulement pour se positionner. Supprimer-le avant l’exportation ou bien utiliser un calque « Guide » pour le rendre invisible.
  • Utiliser les mêmes dimensions de scène pour les différentes animations d’un seul objet.
  • Utiliser un symbole « Graphique » au lieu d’un « MovieClip ». Les animations Graphiques sont lisibles par TexturePacker.

Capture d’écran 2013-03-01 à 17.45.44

  • Créer un fichier .fla par animation.
  • Toujours travailler pour l’échelle 2048×2948 iPad retina. Afin d’être déjà prêt pour l’export iPad retina :).

3. TexturePacker

Dans TexurePacker

Utilisons TexturePacker pour exporter un spritesheet compressé pour une application universelle.

  1. Ajouter pig_walk.swf et pig_dead.swf dans TexturePacker
  2. Cliquer sur le […] puis sélectionner le dossier d’export et rentrer le nom de fichier : pig-ipadhd.plist (ipadhd pour l’exportation universelle).
  3. Texture au format : zlib compr, PVR (.pvr.ccz, Ver.2)
  4. Cocher Premultiply alpha
  5. AutoSD: régler cocos2D ipad/hd/sd et valider en cliquant sut Apply.
  6. Sauvegarder le fichier puis cliquer sur Publish. TexturePacker va alors exporter 6 fichiers, les images .pvr et les bases de données .plist pour chaque format (ipad/hd/sd).

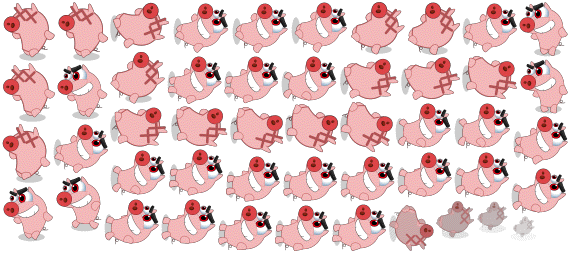
Voici le rendu du spritesheet:

pig

Astuces TexturePacker

  • Régler l’image en couleur RGBA4444 si vous souhaiter optimiser les médias. Puis régler le Dithering à FloydSteinbergAlpha pour avoir un meilleur rendu sur les dégradés de couleur.
  • Toujours travailler avec le même framerate dans Flash et dans XCode.
  • Les dimensions maximales sont de 4096×4096 pour une texture de type iPad retina et 2048×2048 pour un iPhone 3GS. Mais TexturePacker s’occupe de redimensionner tout ça.
  • Cocher Allow rotation
  • Régler size contraints à Any size
  • Si vos sprites sont coupés sur les côtés dans votre rendu régler Trim mode à None.
  • Cocher Enable auto alias
  • Soyez curieux et testez d’autres réglages ;).

4. XCode

Dans Xcode

  • Créer un nouveau projet Cocos2D avec le template installé.
  • Régler le iOS deployment Target à 5.1 au moins.
  • Ajouter le fichier AnimatedSprite.m et le fichier AnimatedSprite.h dans votre projet XCode. Ne pas oublier de cocher la « target » du projet au moment de l’importation.

Capture d’écran 2013-03-02 à 11.56.56

  • Si vous utiliser ARC dans votre projet ajouter un « flag » sur le fichier : Target > Build Phases > Puis ajouter le « compiler flag » sur le fichier AnimatedSprite.m > –fojbc-arc. NB: Par défaut l’ARC n’est pas activé.

Capture d’écran 2013-03-01 à 16.58.30

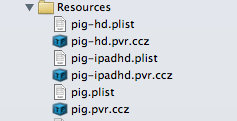
  • Ajouter de la même manière ces fichiers dans le projet XCode :
    • pig.plist
    • pig.pvr.ccz
    • pig-hd.plist
    • pig-hd.pvr.ccz
    • pig-ipadhd.plist
    • pig-ipadhd.pvr.ccz

Capture d’écran 2013-03-02 à 11.57.02

  • Ouvrir le fichier HelloWorldLayer.h depuis XCode et remplacer le par celui ci :
// When you import this file, you import all the cocos2d classes

#import "cocos2d.h"

#import "AnimatedSprite.h"

// HelloWorldLayer

@interface HelloWorldLayer : CCLayer

{

    AnimatedSprite *pig;

}

// returns a CCScene that contains the HelloWorldLayer as the only child

+(CCScene *) scene;

@end
  • Ensuite utiliser ce code pour la classe HelloWorldLayer.m :
// Import the interfaces
#import "HelloWorldLayer.h"

// Needed to obtain the Navigation Controller
#import "AppDelegate.h"

#import "AnimatedSprite.h"

#pragma mark - HelloWorldLayer

// HelloWorldLayer implementation
@implementation HelloWorldLayer

// Helper class method that creates a Scene with the HelloWorldLayer as the only child.
+(CCScene *) scene
{
	// 'scene' is an autorelease object.
	CCScene *scene = [CCScene node];

	// 'layer' is an autorelease object.
	HelloWorldLayer *layer = [HelloWorldLayer node];

	// add layer as a child to scene
	[scene addChild: layer];

	// return the scene
	return scene;
}

// on "init" you need to initialize your instance
-(id) init
{
	// always call "super" init
	// Apple recommends to re-assign "self" with the "super's" return value
	if( (self=[super init]) ) {

		self.touchEnabled = YES;

		// Load the pig spritesheet
		[self loadSpritesheet:@"pig"];

		// Create the pig instance with a default sprite
		pig = [AnimatedSprite spriteWithSpriteFrameName:@"pig_walk.swf/0000"];

		// Init a looping animation
		[pig addLoopingAnimation:@"walk" frame:@"pig_walk.swf/%04d" delay:0.05f];

		// Init an animation
		[pig addAnimation:@"dead" frame:@"pig_dead.swf/%04d" delay:0.05f target:self callback:@selector(removePig)];

		// Set the position of the sprite
		pig.position = ccp(200,200);

		// Add the sprite in the scene
		[self addChild:pig];

		// Start the walk animation
		[pig startAnimation:@"walk"];

	}
    return self;
}

- (void) ccTouchesBegan:(NSSet *)touches withEvent:(UIEvent *)event {
	CCLOG(@"Start dead animation");
	[pig startAnimation:@"dead"];
}

- (void) removePig {
	CCLOG(@"Remove pig");
	[pig removeFromParentAndCleanup:YES];
}

- (void) loadSpritesheet:(NSString *)spritesheetName {

	[CCTexture2D PVRImagesHavePremultipliedAlpha:YES];
	[CCTexture2D setDefaultAlphaPixelFormat:kCCTexture2DPixelFormat_RGBA4444];
	NSString *pvrccz = [NSString stringWithFormat:@"%@.pvr.ccz", spritesheetName];
	CCSpriteBatchNode *loadingBatchNode = [CCSpriteBatchNode batchNodeWithFile:pvrccz];
	[self addChild:loadingBatchNode z:2];
	NSString *plist = [NSString stringWithFormat:@"%@.plist", spritesheetName];
	[[CCSpriteFrameCache sharedSpriteFrameCache] addSpriteFramesWithFile:plist];
	[CCTexture2D setDefaultAlphaPixelFormat:kCCTexture2DPixelFormat_Default];
}
// on "dealloc" you need to release all your retained objects
- (void) dealloc
{
	// in case you have something to dealloc, do it in this method
	// in this particular example nothing needs to be released.
	// cocos2d will automatically release all the children (Label)

	// don't forget to call "super dealloc"
	[super dealloc];
}
@end

Cliquez sur Run et voilà le travail :).

Si vous tapez sur l’écran l’animation de mort va se lancer et le cochon va disparaitre.

C’est fini !

Capture d’écran 2013-03-04 à 00.09.40

Vous pouvez également lire les commentaires du fichier AnimatedSprite.h pour plus de détails sur cette classe qui permet de gérer des animations.

A ++ ![:]

Author: Benoit Freslon